‘The LegoLCD Project’ December 23, 2007
Last month, I briefly mentioned the serial LCD I’d dug out of storage. I have a number of ideas for it, such as using it as the display for a Python-based MP3 player. Whatever I do with it, however, I need to put it into an enclosure.
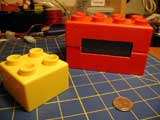
 A while back, I saw something interesting: the LEGO Quatro system. Whereas Duplo is twice the side of a standard LEGO brick, Quatro is twice the size of Duplo brick. It’s very clever: toddlers can be given Quatro bricks, then use them with Duplo bricks when they get older. The kids can then use the Duplo bricks with standard LEGO bricks when they get older still. In any case, some gargantuan LEGO bricks seemed perfect for some sort of project or another. I didn’t have any specific idea in mind when I bought them, but a pair of 2×4 bricks ended up being the perfect size for the serial LCD.
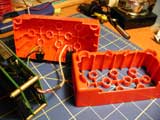
The giant LEGOs are made of a softer, more flexible plastic than standard LEGO bricks, possibly polypropylene or HDPE. I was able to hollow them out fairly easily with a large X-Acto knife by cutting a series of opposing crescents, although a pair of heavy end nippers or a linoleum cutter would have helped. Unfortunately, the soft plastic scratches extremely easily. While I avoided making large, individually visible scratches, I made enough tiny scratches to dull the finish and made it look somewhat mottled. Some plastic polish and acrylic floor wax may improve this, however.
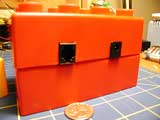
 Since the enclosure consists of two stacked bricks, putting in the power and data sockets was easy. The LCD module has a built-in voltage regulator, so power is supplied via a standard coaxial power socket by a standard wall-wart transformer. For the data, I wanted to use as small a connector and as thin and flexible a cable as I could. My original idea was to use an RJ10 socket (the kind used between phones and their handsets), but I couldn’t find a straight RJ10 cable with more than two conductors. I ended up using an RJ45 socket on the enclosure and hacked together a custom 9 pin D to RJ11 cable to connect to the computer. I chose the pin-out arbitrarily, but in hindsight I should have made it compatible with the RS232D standard.
 I managed to preserve a thin layer of the interior structure for the bottom, preserving the LEGO-ness of the brick — it can still be stuck to the top of other bricks. I have had some vague ideas of putting electrical conductors in the nubs and making snap-on peripherals in other bricks, possibly using 1-Wire. However, this LCD module is just a regular serial LCD and doesn’t support 1-Wire. I do have a small 1-Wire LCD and a dozen assorted Quatro bricks left over, so maybe that will be another project.
There are two significant things that still need to be done. First, I need to find a way to connect the backs of the bricks. The front will be held together by the LCD’s mounting screws, but this sort of pries the back apart — another downside of the bricks’ softer plastic. My plan is to glue some threaded sockets into the back of the top half, then use screws underneath to hold on the bottom.
The second significant addition is a set of buttons. The serial LCD module supports a 4×4 keypad matrix. As can be seen in the photos, the nubs on top of the bricks are hollow; my plan is to put little PC mount buttons inside these, then possibly putting a disc of matching plastic on top of that. The buttons will be soldered to wires fed through the top of the brick, since the soft plastic obviously won’t stand up to a soldering iron.
I’m not sure when I’ll continue work on this; it was just a spur-of-the-moment thing. I’ll give this project its own category then.
Leave a Reply
You must be logged in to post a comment.